scarythingsopener

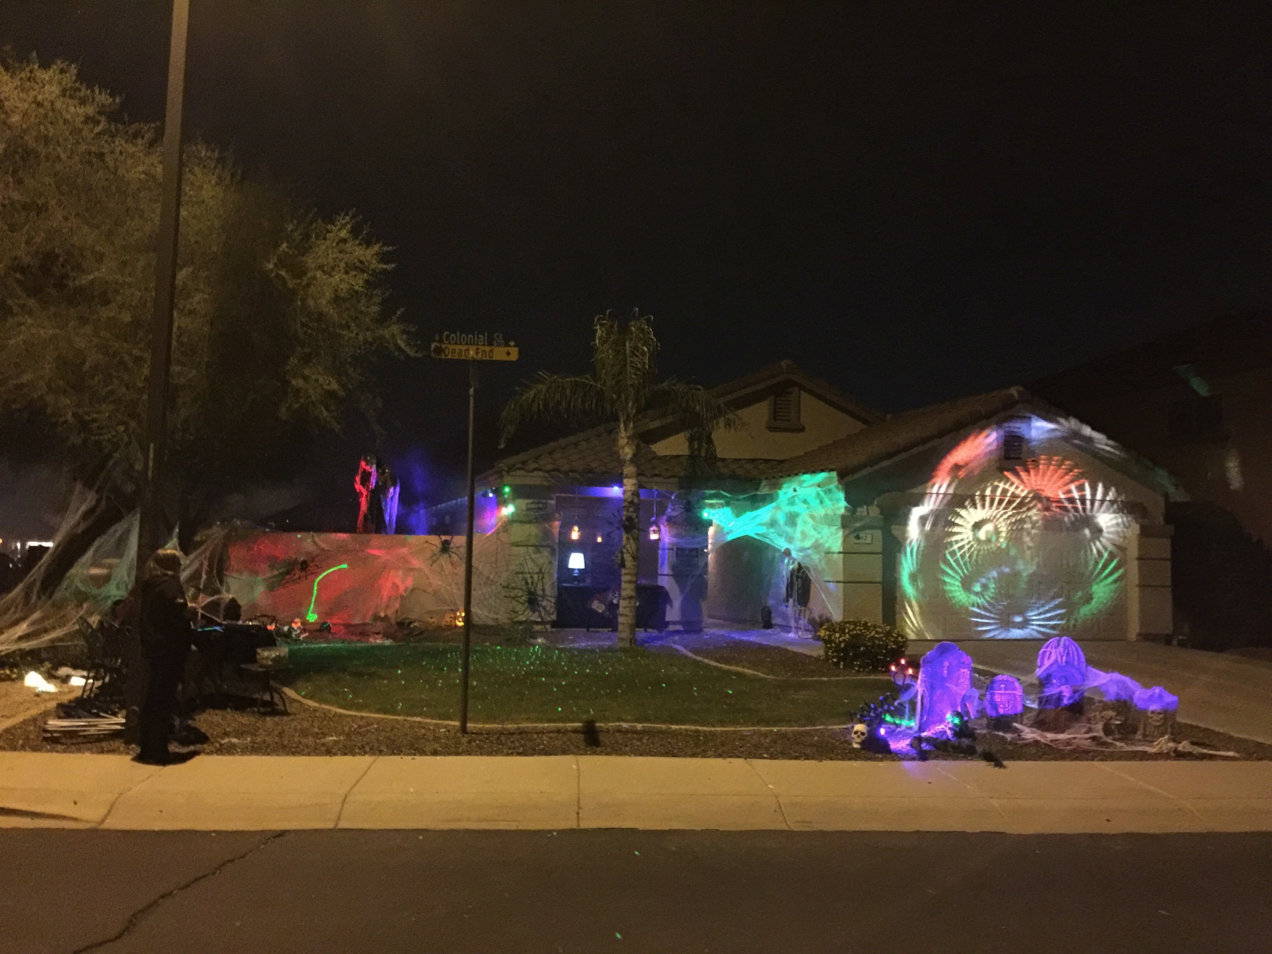
It’s not unusual for me to transform my whole front yard into a Halloween haunt with everything from props, lighting, lasers, fog, and sound. So I spent a month of weekends putting this together (and a few week nights). This is actually a great little control system problem. This experiment ended up being about 11 props run by 9 Wi-Fi Arduino boards. The best way to tell you what this does is to show you. Here is a video of my Halloween Haunt from 2015:

YouTube player

Those Halloween animatronic props you get from places like the Spirit Halloween Superstore are notoriously bad at triggering when you want them to. We can fix all that. You can trigger any prop anytime you want simply from your phone. You can put it on random when you don’t want to run it manually and you can create great haunt sequences for walkthroughs. So let’s dig in!

HSIP_CVR_LR
Love Halloween? Love making? Check out our special Halloween issue for more projects to scare and delight! Available now online and in print at fine retailers everywhere.

Parts

For this project there are some things you probably already have, some things that depend on how many props you have, and some things you may need. I did a few things in the design of the prop controllers to allow you to reuse your Photon (its on headers) and wire in different props later (screw terminals). Check out the list to the right.

Build

Big Picture

It always helps to start with the big picture. Here is what I considered for my setup.

1) What props do you want to control and where?
Here was my original plan:

originallayout

And here’s a photo of the end result:

Screen Shot 2016-09-12 at 1.22.54 PM

2) How are you going to interface to them (test, trigger, light), how many controllers do you need, and which ones are likely going to need antennas (because they are furthest from the house)?

Here was how I planned to interface to my props:

testinterface

3) Finally it pays to understand how the whole thing fits together.

This is how your setup will work also:

halloweenarchitecture

Project Steps

STEP 1: BUILDING THE CONTROLLER BOARD

Building the controller board takes a little soldering skill and some patience. It’s pretty simple though. Here are the parts and the final product:

step1parts

step1boxes

Here is the circuit diagram:

step1diagram

Here are the steps to build it (and by the way, it is worth laying out your parts on the board before starting):

1. Solder the standoffs for the Photon on the board
2. Solder the screw terminals
3. Solder the transistors
4. Solder the resistors
5. Solder the I/O (D3, D4, D5, D6)
6. Solder the grounds

Here is a close up of how I soldered my boards:

step1solderedboard

Final step here is to put the board in a project box. I simply drilled a hole in one side of the box to bring in the prop wires, power, and optional antenna. I also used a red permanent marker to mark the positive side of each terminal. A zip tie makes a nice strain relief. I also labeled each box with its Particle Photon name so I wouldn’t forget.

Note: Particle no longer produces the Spark Core, but you may see resources around the web that still reference the Spark Core. The Photon and the Spark Core are drop-in compatible, so this project and any other resources you refer to should work the same regardless of which component you have on hand.

step1inthebox

STEP 2: INTERFACING TO YOUR PROP

I found three ways to integrate to most of my Halloween props: the test connector (when present; this is a good tutorial), the light sensor (when present), or the foot switch connection (when present). All of these techniques either used a simple transistor or an LED to trigger the actual prop. You will want to write down the port (led1, led2, transistor1, transistor2) and Particle Photon board name you connect the prop to for the code later. I just put it in a simple spreadsheet.

Test Port

Screen Shot 2016-09-12 at 2.52.59 PM

The test port connector looks like this. If you still have the test button for your prop, you can cut the button off and wire it to your prop control transistor. Test the polarity with a voltmeter to determine which side is ground on the test switch.

Light Activated

Screen Shot 2016-09-12 at 2.53.42 PM

If you have LED-controlled props, be sure to put a resistor (typical 200–300 ohm) in the line on the positive side. This is typically the easiest way to activate a prop — simply tape the LED over the prop’s light sensor with black electrical tape. The longer lead on the LED is always positive. Connect it to one of the LED control switches. Hide the wire and controller and you are ready to rock.

Foot Trigger

Screen Shot 2016-09-12 at 2.55.42 PM

Some props have what looks like a micro stereo port for a foot controller. You can hack a cheap audio cable and test which part of the tip is positive and negative with a voltmeter. Then connect it to one of the transistor ports on the controller.

STEP 3: LOADING THE FIRMWARE

Good news: I wrote the firmware you will need for this project (you can download the .rtf) and you don’t need to modify it. Here are the steps to set up each of your boards.

1. You can set up your Particle Photon by following these directions. The Particle program for your phone makes it easy to test if your Photon is on the network and working. There is also an online console.
2. You can update your firmware and put the Photons in non-tinker mode.
3. Next load the code below into the builder and load it to your device.

STEP 4: TWEAKING THE CONTROL SOFTWARE

Here is another .rtf download with the generic code to serve the user interface. Put this into an index.html file.

You will need to tweak this file to add in your devices, your sequence (with timing), and your Particle access token. It’s not as hard as it sounds. I designed the software to use simple data structures that you can modify to add all this.

There are five places in the code that have numbered comments where you need to change things (oh, and feel free to change the main title of the web page to your amazing haunt).

1) This is where you add buttons for your specific props. These buttons will be used to trigger those props individually. The name you give the prop in the “doit” function will be used later to look up what action to take.

2) Here you enter the names of your Photon boards and ids from the Particle Build platform. This will be used to address each individual board.

3) This is where you map your prop name, to a Proton device, to an output, and an action. The action should just be “pulse”. The output is the connection you made to the board as “led1”, “led2”, “transistor1”, or “transistor2”. You wrote this down when you were wiring up your props, right?

4) This is where you define a prop sequence and the timing. Basically it is a prop name and the time to wait to trigger it. You will want to see how long your props activate and adjust this timing accordingly. We don’t want props talking over each other.

5) Lastly you need to enter your access token from Particle so that the Javascipt can make web service calls to the Particle service. You can find this token under Settings in your build console.

Note: Since this file contains the access token (which you can invalidate anytime), if you serve this file publicly, anyone can activate your devices. I keep the file on devices on my private home network. Again, it isn’t a big deal because you can change the token after Halloween if you are worried about people activating your devices.

STEP 5: NETWORKING TWEAKING

A good way to test your devices is to go in the yard where they will be deployed in tinker mode and turn on and off the onboard LED. If it is slow or unreliable you may need to add an antenna (listed in the parts list) to that Photon or possibly add a network extender (also in the parts list). Note that network extenders typically have a different network name so you will likely have to reassign the Photons to the extended network.

STEP 6: HOSTING THE WEB PAGE

The index.html file can be opened directly in any web browser. If you want to serve the file to any device on your network, here is some simple code to run a web server using Node. Save this to a server.js file.

var connect = require('connect');
var serveStatic = require('serve-static'); connect().use(serveStatic(__dirname)).listen(8080);

To run the server on your Mac or PC you will need to download Node. Then put the index.html file in the same directory as the server.js and run Node from the command line like this:

node server.js

Now from any web browser on a device on your network (laptop, phone, tablet, etc.) you can access your control software by simply going to this URL:

<your IP address>:8080

To get your IP address you can look in your network setting.

STEP 7: HAVE FUN!!!

It is insanely fun to be able to set props off precisely when you want to. Here was my control panel from last year. Yours will be different based on the props you have and the names you choose.

Screen Shot 2016-09-13 at 9.37.20 AM

Early in the evening when I am not out watching things, I put it in random mode. This sets off a random prop every 30 seconds. This definitely catches the attention of passersby. When we are outside, we set off a sequence when kids come up or trigger individual props when people get near them.

It may have been a lot of work, but you will delight the neighborhood, have a lot of fun being a scare master, and learn a lot of new skills you can apply to other hacking.

I would love to hear about your haunt. Share your set-up in the comments below, or send videos and notes to me at theguybieber@karmas.co. Happy haunting!!!

For Uber Geeks and the Crazy Ones

For the uber geeks out there, I did a talk on learning from military and consumer IoT (this hack). If you’re interested, you can check out the slides. If you are interested in learning faster, doing faster, and being more creative, you can check out my upcoming book Potential and service Karmas. We love makers, designers, entrepreneurs, engineers, and anyone with a dream.